How Can A Beginner Practice Coding?
(feat. Microsoft Windows Notepad)
Today's Contents:
• Create a Web Page with Notepad
Hi, Radiant Guys! You don't know how happy I am to see you again. Last time, we looked at 10 key HTML terms for beginners. These are fundamental concepts, so please remember them.
In today's post, you will finally practice how your coding appears on a web page. We will use Microsoft's "Notepad" for this practice.
Notepad is a simple text editor that's built into Microsoft Windows. The executable file is notepad.exe. If you're using a Mac computer, use "TextEdit", a free text editor.
Don't you think it would be fascinating? I'm a total beginner in coding, but the more I learn, the more I think it's really fun. Do you ever think you're too old to learn coding? Age is just a number! I hope you don’t give up on any challenge because of your age. This moment is the perfect time to learn. So let’s take on the challenge together.
• Open "Notepad".
• Enter <html></html> as the below. This serves to declare that a web document is starting.
• Place the cursor right after the opening <html> tag and click the "enter" key on the keyboard to move it to the lower line.
• Click the "tab" once on the keyboard and put <head></head> as below.
• Place the cursor right after the closing </head> tag as shown in the image below, then click the "enter" key to move to the line below.
• Click the "tab" key and enter <body></body> tags.
• Click the "tab" key once to make it, as shown in the image below.
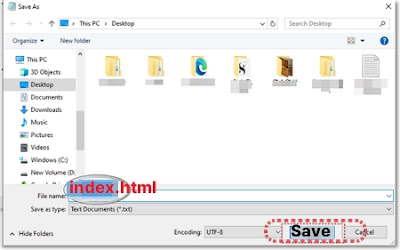
• In the top menu bar, select File > Save As. Then, name the file index.html and save it on your desktop. The "index" is the file name, and the "html" is the file extension name.
🎯 TIP
The file extension is the part attached to the end of the file name that indicates the purpose or type of the file. Typically, file extensions are expressed as a period followed by the file name and a specific string.
• Double-click the document named “Index” created on your desktop.
Then, the HTML document written with Notepad is displayed through the web browser.
Congratulations! Today, we used Microsoft's simple free text editor, Notepad, to create an HTML document and then practiced how it would be displayed on a web page. In other words, we saved the coded document with an HTML file extension and looked at how the web browser visually represents this document as it creates the primary framework on the web page.
When I first learned and practiced this content, I thought it was really fun. Did you find the content of this post challenging, or did you find it interesting, like I found? I'm curious about your opinion.
In the next post, we will practice coding using more diverse tags using the free coding editor "Visual Studio Code." I hope today's post was helpful to you, and I'll see you next time, Radiant Guys!
NEXT POST ➤ Step-By-Step Coding for 100% Beginners (feat. Visual Studio Code)
🌴🐫 🌴🐫 🌴🐪


