How to Edit the Background Image
in the "Header"
(feat. Blogger Dynamic Views)
Today's Contents:
• Prepare a Background Image (feat. Image URL)
• Edit the Background Image (feat. Pixlr Editor)
• Hide the Existing Blogger's Title and Description
(feat. CSS code & Layout menu)
Hi, Radiant Guys! How was your day today? In the last post, I explained how to find my CSS code and gave an example of how to modify CSS code in Blogger Dynamic Views.
In this post, I would like to talk about how to edit the background image already in use in the header area. In particular, I would like to investigate the case of using the image given by Google Blogger as the header's background image. All right, Guys, let's get started.
| Preparing an Image to be inserted into the Header
⎖ Bringing up a Background Image from Google Blogger
• Click the "Background Image" box of the Background tab in the Blogger Theme Designer.
• Choose a category you like.
• Select the background image you want in the rightmost album.
• Click the "Done".
• Click the "SAVE" icon to apply to your Blogger.
🎯 TIP
The smaller the file size, the faster the loading speed, which is advantageous for exposure to the Google Browser.
⎖ Copying the URL of My Background Image
• Right-click on the background image and select the “Inspect” in the menus.
• The window is divided, with Blogger on the left and Google Chrome Developer Tools on the right.
• Select the row with the “body data” of “Elements” on the left side of the Chrome Developer Tools window.
• In the left pane of Chrome Developer Tools, scroll down to find the "Background" information, which is the "style" of the left "body" element. Among them, copy the link URL from the row that displays the URL of the background image.
🎯 TIP
The URL (i.e., the letters in blue) of the background image from the Chrome Developer Tools is as follows:
//themes.googleusercontent.com/image?id=0BwV…MZGQ5M2I2MGEtM2JjMi00MjVhLWJlNmUtN2YyMDcyMDRlYWE3
By the way, when copying the link address of the background image inserted into the header area on the right pane of the Chrome developer tools, if you use the mouse to specify a block and copy it, it will be copied as shown above. As you can see, an error may occur when loading the link address in the "Pixlr Editor" because part of the link address is copied with its omission.
So, hover your mouse over the link address, right-click, and select "copy link address" to copy the background image URL perfectly.
https://themes.googleusercontent.com/image?id=0BwVBOzw_-hbMZGQ5M2I2MGEtM2JjMi00MjVhLWJlNmUtN2YyMDcyMDRlYWE3
🎯 Tip
This method allows you to load images to the "Pixlr Editor" large enough for editing.
| Modifying the Background Image
Next, I will modify the design of the background image inserted into the header area using an image editor. In this case, I will use "Pixlr", an integrated cloud platform with image editing tools.
⎖ Open the Background Image from the Pixlr Editor
Search for “Pixlr” in your browser. Go to the Pixler homepage.
• Select the "Pixler E". It is a free, highly functional photo editor.
• Select the meatballs menu icon and click the "Load Image from URL".
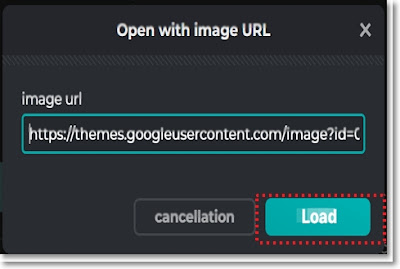
• Paste the URL of the copied background image in the box.
🎯 TIP
You can try pressing the "Home" and "End" keys on the keyboard to check the link address string. If the URL format is correct, the URL box outline will change from red to green.
• Click the "Load" to open the image.
⎖ Editing the Background Image from the Pixlr Editor
Since the vertical height of the blogger's header area is 65 pixels, I will create a frame with a height of 65 pixels at the top of the background image.
• Hover the "+"sign to add an evacuation layer in the "layers" panel and then select the "evacuation".
• Hover the "+" sign to add a new text layer in the "layers" panel and then select the "text".
As shown in the image below, a background layer, an empty layer, and a text layer have been created in that order.
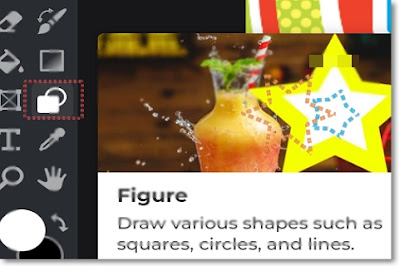
• Select the "Figure".
• In the Figure Tool menu, select the "Drawing" Mode, the "Rectangle" Type, and Disable painting.
• Use the mouse to draw a rectangle, keeping in mind that the blogger's title and description will be placed in the header area.
• Select the "Order" icon.
• Select the "freedom" as the aspect ratio and enter the "65" as the height. Then, the height of the frame is adjusted to 65 pixels.
Next, let's enter the blogger title and description. First, let's add a text layer.
• Click the "+" sign in the layer panel and select the "Text" in the "+" menu.
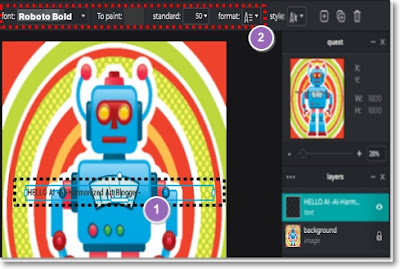
• Enter your blogger title and description in the text layer.
→ ①
• Set the font, color, size, and format from the menu bar at the top.
→ ②
🎯 TIP
It doesn't matter if you set the text first and then write it. My selections for the above items are below.
- Font: "Pretendard Bold", free for commercial use (as of Mar 7, 2024), personally installed additionally on the Pixlr Platform
- Color: #393838
- Size: 38
- Format: Left align, Bold
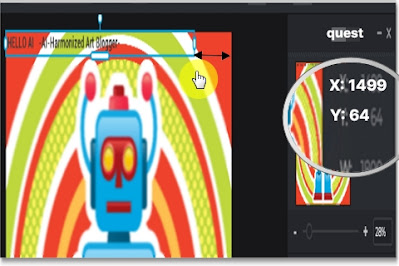
• Place the text box at the top left of the background image.
🎯 TIP
The maximum header area size in the Blogger is 1920 (Width) × 65 (Height) pixels. This is the reason for creating the frame 65 pixels high on this background image. As the image above shows, after moving the text box to the top of the image, when you hover your mouse over the lower right corner of the text box, the exact coordinates of that point appear as a value on the Y-axis in the quest panel on the right. Therefore, it is also a convenient way to set the font size and position of the text box by referring to it.
⎖ Save the Modified Background Image
• Click the "Save" icon.
• Select the "JPG".
• For quality, look at the file size under the edited image and select within the 3MB required by Google Blogger.
• Click the "Save as".
🎯 TIP
If you download an edited image for the first time without registering as a member of Pixlr, the following message will pop up. It is a notice that if you sign up for free membership, you will be provided with three edited image downloads per day for free.
⎖ Change the Existing Blogger Background Image with the Modified Image
• Open the "Blogger Theme Designer" in your Blogger.
• Choose the "Background".
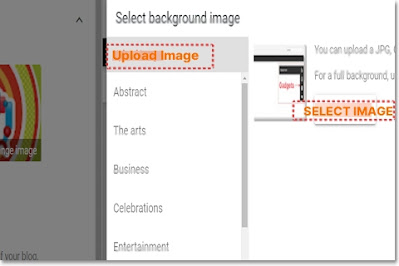
• Click the Background image box to open the “Select Background Image” window.
• Select the "Upload Image" and "SELECT IMAGE" to load the image.
• Open the modified image file to upload it to the Blogger.
• Click the “Done” to complete the upload.
• Click the "Save" icon to apply to Blogger.”
• Click the “View Blog” to see the results.
| Hiding existing blogger title and description
The text on the modified background image and the default text in the existing blogger appear to overlap. I would like to introduce two ways to hide an existing blogger's title and description text.
⎖ METHOD 1. By Adding CSS Code on the Theme Designer
• Click the “Advanced” tab in the Theme Designer and select “ADD CSS”.
• Enter the CSS code as follows.
However, as shown above, I would never recommend changing the CSS code to hide the existing blogger's title and description. This may result in future disadvantages in SEO (i.e., search engine optimization). Therefore, even though it is cumbersome, I recommend removing the text from the gadget, as shown below.
⎖ METHOD 2. By Removing the Text from the Gadget
• Select the "Layout" on the dashboard.
• Click the "Edit" in the "Page Header Gadget" box.
[Image: The Page Header Gadget in the Layout window]• Writing a Blog title is essential. You can not skip it. So, type a "+" sign instead of letters in the existing blog title field so that the new blog title inserted in the header area is clearly visible.
• Additionally, the content in the Blog description field is removed.
• Click the "SAVE".
• Click the "Fluffy disc" icon at the bottom right to apply to Blogger.
• Click “View blog” to check the results.
According to the below, the existing blog title and description are not visible in the window, but the new blog title and description are visible. The overlapping part is no longer visible even without modifying CSS coding. Not bad, right?
Congratulations! In this post, we learned how to modify the background image already in use in the blogger's header area and make the existing blogger's title and description invisible. In particular, the discussion focused on editing images provided by Google Blogger, rather than modifying images from the user's computer.
I wonder if you understood and followed the above content well. I'm sorry it's a bit longer than expected. Next time, I will have to work harder to create posts that readers can digest more comfortably.
In the next post, I will introduce how to change the font and color of the blogger's title and description in the header. I hope this post was helpful to you, and I'll see you next time, Radiant Guys!
❆❆❆ ❆❆❆ ❆❆❆
Posted by Ayul


